Quickstart
Set up Rever for your team
This walkthrough will help you get started with Rever in no time. You’ll learn how to activate your account, configure your company profile, set up your chart of accounts, invite users, assign roles, and establish approval workflows—all through simple, step-by-step instructions.
What you’ll accomplish:
- Sign up and activate your Rever account
- Configure your company profile and address details
- Add or sync your chart of accounts
- Invite users with appropriate role assignments
- Set up multi-level approval workflows (L1–L5)
- Understand the roles and permissions available in Rever
Before you begin
Steps to Get Started
To begin, you will first sign up and access Rever through the web portal using Chrome, Edge, or Firefox. After clicking Sign Up, you can register with your corporate email address by providing the required details. A verification email will be sent, and once confirmed, your account will be activated.
- Visit the Rever Web Portal (Website) using a supported browser (Chrome, Edge, or Firefox).
- Click Sign Up and register using your corporate email address by providing the required minimal details.
- Verify your email to activate your account.
- Configure Company Profile Once your account is active, the next step is to configure your company profile. This is done by navigating to Settings → General Settings, where you can enter essential details such as your company’s email address, phone number, preferred date format, business type, and industry. You will also be prompted to provide a complete address, including the country, state, city, and ZIP code.
- Go to Settings → General Settings.
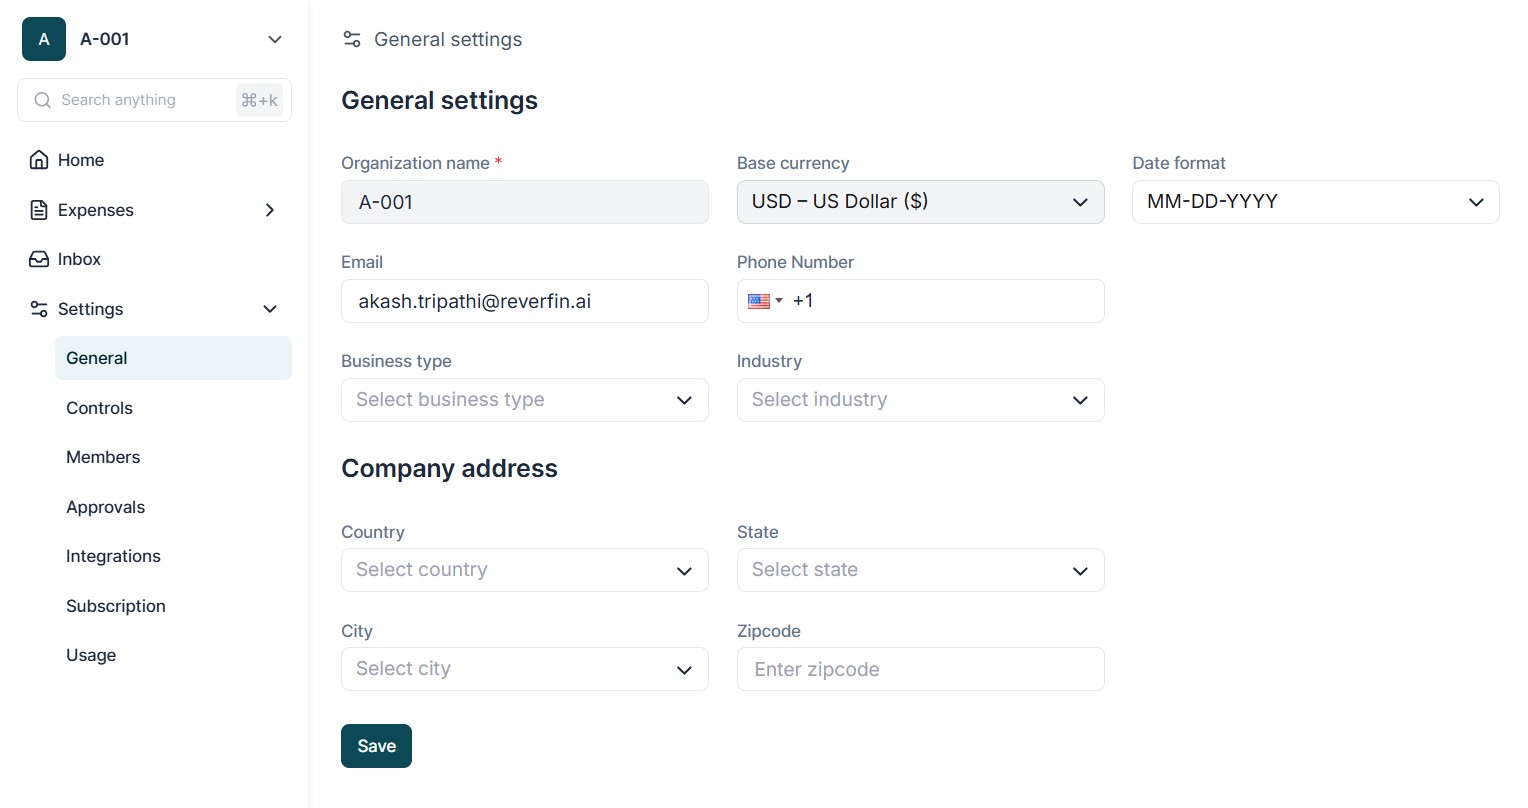
- Enter Company Information: Provide the company’s email ID, phone number, preferred date format, business type, and industry.
- Store Company Address: Record the complete address details, including country, state, city, and ZIP code.
- Add or Sync Chart of Accounts After the company profile is set up, you will need to add or sync your chart of accounts. Rever offers two options: manual entry or integration with QuickBooks. With manual entry, you can directly create account groups such as Assets, Liabilities, and Expenses. If you prefer automation, you can connect Rever to your QuickBooks account (admin credentials required) and enable continuous synchronization for real-time updates.
- Option 1: Manual Entry
- Add your chart of accounts directly in Rever by creating account groups (Assets, Liabilities, Expenses, etc.).
- Option 2: QuickBooks Integration
- Connect Rever to your QuickBooks account (requires QuickBooks Admin credentials).
- Enabled continuous sync for live updates.
- Invite Users & Assign Roles
Next, you can invite users and assign roles by going to Settings → User Management. Here, you can add users by entering their email addresses and assigning them roles such as Member, Lite User, Finance Manager, or System Admin. Each role comes with specific permissions, ensuring users only access invoices, approvals, and payments relevant to their responsibilities.
- Navigate to Settings → Members.
- Invite users by entering their email addresses.
- Assign appropriate roles such as Member, Lite User, Finance Manager, System Admin.
- Configure role-specific permissions to control access to invoices, approvals, and payments.
- Set Up Approval Workflows Finally, you should set up approval workflows by navigating to Settings → Approvals. Rever allows you to configure multi-level approval hierarchies (L1–L5), which can be applied to both purchase orders (POs) and bills. This ensures that transactions follow a structured review process before being finalized.
- Navigate to Approval Settings: Go to Settings → Approvals and configure multi-level approval hierarchies (L1–L5).
- Apply Approvals: These approval levels can be defined for both Purchase Orders (POs) and Bills.
Roles & Permissions
Rever provides role-based access control to ensure each user has appropriate access based on responsibilities. Correct role assignment is essential for workflow efficiency, security, and compliance.
Admin
Full system access including configuration, integrations, user management, and finance oversight. Admins can:
- Configure approval workflows rules.
- Connect external systems such as QuickBooks or bank feeds.
- Add, remove, or update user accounts and assign roles.
- Review AP KPIs such as invoice processing times and approval turnaround.
- Access all reports and dashboards.
- Handle troubleshooting, audit logs, and ensure compliance.
- Manage subscription plans and system settings.
Approver (L1–L5)
Users who approve or reject POs and invoices based on configured thresholds:
- Review items assigned for approval.
- Add comments when rejecting or escalating transactions.
- Ensure transactions comply with internal policies.
Member
Operational users responsible for invoice processing:
- Upload invoices manually or via email/OCR capture.
- Perform 2-way or 3-way matching of invoices against POs and GRNs.
- Flag discrepancies or exceptions for review.
- Verify with Lite User: Confirm whether goods confirmation functionality is available for Lite users.
Lite User
Confirms receipt of goods/services (acts as GRN confirmer):
- Verify delivered goods or services against POs.
- Provide digital confirmation to support 3-way matching.
- Flag partial deliveries or discrepancies for Member/Approver review.